
How Do You Train a New Hire to Use a Gas Detector in 15 Minutes?
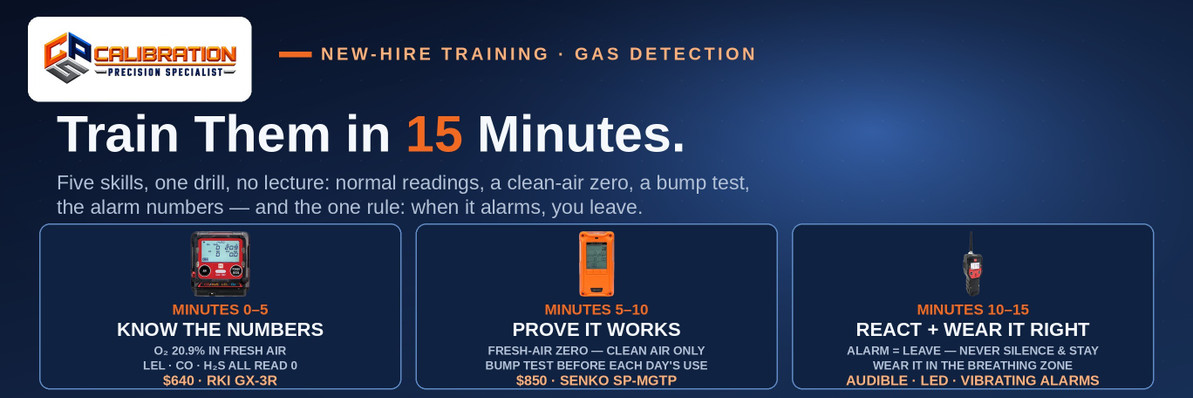
You can train a new hire to use a gas detector safely in 15 minutes by teaching five things in order: what the monitor measures and what normal readings look like (oxygen 20.9%, combustible gas 0% LEL, carbon monoxide 0 ppm, hydrogen sulfide 0 ppm in fresh air), how to power on and fresh-air zero in clean air only, how to run a bump test — the functional check OSHA guidance, following ISEA, calls for before each day's use — the alarm numbers that mean leave (oxygen below 19.5% or above 23.5%, LEL at 10%, CO at 35 ppm, H₂S at 10 ppm on typical factory settings), and the one rule that outranks all of them: when the monitor alarms, get out — never silence it and stay. Fifteen minutes qualifies a new hire for supervised work with that specific monitor; it is not confined-space entry training and does not replace your site's full safety program.
Most new-hire detector training fails in one of two directions. Either it is a two-hour lecture the hire forgets by lunch, or it is "clip this on, it'll beep if something's wrong" — which teaches nothing at all. The 15-minute version works because it is a drill, not a lecture: the hire holds the actual monitor they will wear, performs each step with their own hands, and finishes by teaching the steps back to you. Everything in the lesson is something they will do on their very next shift.
Before the Clock Starts: What You Need in the Room
- The exact monitor the hire will use. Training on a different model teaches button locations that do not transfer. If your fleet mixes brands — an RKI GX-3R ($640) on one crew, a SENKO on another — train each hire on their own unit.
- Calibration gas, regulator, and calibration cap for the bump test portion. No gas, no bump test — and the bump test is the heart of the lesson.
- A genuinely clean-air spot. Fresh-air zeroing must happen away from vehicle exhaust, running equipment, and process areas. Pick the spot in advance; "fresh air" next to an idling forklift teaches a poisoned zero.
- Your site's alarm setpoints, written down. The numbers in this post are the common factory defaults. Your facility may set them differently — the hire learns your numbers.
Minutes 0–5: What It Measures, and What Normal Looks Like
Hand the hire the monitor, still off. The first lesson is the four channels of a standard 4-gas monitor — the full explainer is in what a 4-gas monitor detects — taught as four sentences:
- Oxygen (O₂) — "You need it, and other gases push it out. Normal air is 20.9%."
- Combustible gas (LEL) — "Fuel in the air, shown as a percentage of the amount needed to burn. Normal is 0%."
- Carbon monoxide (CO) — "Colourless, odourless, comes from engines and heaters. Normal is 0 ppm."
- Hydrogen sulfide (H₂S) — "Rotten-egg smell at first, then it kills your sense of smell. Normal is 0 ppm. Never trust your nose."
Then the concept that makes the numbers mean something: the monitor only samples the air at the monitor. It is not scanning the room, the tank, or the plant — it reads the air touching its sensors, which is why where it is worn (minute 12) matters as much as what it says. Single-gas users get the same lesson with one channel: a single-gas monitor wearer needs to know their one gas cold, including what displaces or produces it on your site.
Minutes 5–8: Power On and Fresh-Air Zero — in Clean Air Only
The hire powers the unit on, in the clean-air spot, and watches the startup sequence: self-tests, sensor warm-up, and the fresh-air zero that sets the instrument's baseline — clean air defined as 20.9% oxygen and zero on every other channel.
Two rules land here, and both are about where:
- Always power on and zero in known clean air. Zero a monitor in contaminated air and you have taught it that poison is "zero" — every reading after that is offset, and a real hazard can display as safe. This is the single most consequential habit in the whole 15 minutes.
- Never zero indoors in "probably fine" air when the work is elsewhere. Zero where you can verify the air is clean, then walk to the work.
If the unit errors on startup, fails its self-test, or shows a sensor fault, the lesson is just as important: that monitor does not go to work. It gets tagged and swapped. A new hire who learns to hand back a sick instrument on day one is worth more than one who learns to ignore faults politely.
Minutes 8–11: The Bump Test — Prove It Responds Before You Trust It
Now the hire performs a bump test with your supervision: calibration cap on, gas applied, every channel climbs, every alarm — audible, visual, vibrating — fires. The step-by-step is in how to bump test a gas detector; the training points are these:
- Why it exists. A monitor can power on, display normally, and still have a blocked sensor inlet or a dead cell. The bump test is the only quick proof that gas can reach the sensors and the alarms work. OSHA's guidance bulletin on direct-reading portable gas monitors, following the ISEA position, calls for a bump test or calibration check before each day's use, in accordance with the manufacturer's instructions.
- What pass and fail look like. Pass: all channels respond and alarm within the instrument's stated time. Fail — a channel slow, silent, or missing: the monitor comes out of service for a full calibration, and if it fails calibration, it stays out. The hire must be able to say this sentence unaided: "If it fails the bump, I don't use it — I swap it and tell my supervisor."
- Bump test is not calibration. The bump proves response; it does not adjust accuracy. Calibration is a separate, scheduled procedure — which is why the hire also learns to read the calibration-due date on the startup screen or sticker and treat an overdue instrument like a failed one.
Use real calibration gas for this, in date and matched to the instrument. Training with expired gas teaches a room full of people to accept sluggish responses as normal.
Minutes 11–14: The Alarm Numbers, and the One Rule
Write your site's setpoints where the hire can copy them. The typical factory defaults on a standard 4-gas monitor:
| Channel | Low alarm | High alarm | What it means |
|---|---|---|---|
| Oxygen (O₂) | 19.5% | 23.5% | Below 19.5% there may not be enough oxygen to sustain you; above 23.5%, materials burn far more readily |
| Combustible (LEL) | 10% LEL | 20% LEL | At 10% of the lower explosive limit, you are at the action threshold — a tenth of a burnable atmosphere |
| Carbon monoxide (CO) | 35 ppm | Model/site dependent | 35 ppm is also the ACGIH 8-hour TWA — the alarm and the exposure limit arrive together |
| Hydrogen sulfide (H₂S) | 10 ppm | Model/site dependent | Around 100 ppm H₂S becomes immediately dangerous to life and health — and olfactory fatigue means the smell disappears long before that |
Confirm every figure against your own instruments before teaching them — setpoints are configurable, and two fleets rarely match exactly. Teach TWA and STEL in one sentence each while you are here: TWA is your average exposure over 8 hours, STEL is a 15-minute short-term limit, and a TWA/STEL alarm means your accumulated dose — not just this moment — has hit its ceiling, even if the air reads lower now.
Then the one rule, taught verbatim and repeated at the end:
When the monitor alarms, you leave. You do not finish the task, you do not hold your breath and hurry, and you do not silence the alarm and stay. Move to fresh air, then report it.
Cover the three alarm modes so none of them is a surprise in the field: the audible tone (typically 90 dB-class at the instrument), the flashing LEDs, and the vibration — the one that still reaches a worker wearing hearing protection next to loud equipment. A hire who has only ever heard the alarm in a quiet training room may not recognise it over plant noise; the vibration alarm is their backup, and knowing that is part of the lesson.
Minutes 14–15: Wear It Right, and Know Its Limits
- Wear it in the breathing zone — clipped on the chest, collar, or shoulder strap, near the nose and mouth, sensor inlet unobstructed. Not in a pocket, not under a jacket, not on a belt behind the body. The monitor protects the air it samples; worn wrong, it samples the inside of a coat while the wearer breathes something else.
- Pumped vs. worn. If the job needs remote sampling — testing a space before entry — that is a pumped instrument and a separate, specific procedure with its own training. A diffusion monitor worn on the chest is personal protection, not a pre-entry test instrument. Do not let the 15-minute lesson blur that line.
- Three limits to say out loud. (1) It only detects the gases it has sensors for — a 4-gas monitor does not see carbon dioxide, ammonia, chlorine, or VOCs unless fitted for them. (2) Readings take time — sensors need tens of seconds to respond fully, so a quick wave through an area proves little. (3) It does not make a hazardous space safe — it warns; ventilation, permits, and procedure do the protecting.
The Teach-Back: How You Know It Worked
Do not ask "any questions?" — nobody has any. Instead, in the last moments or immediately after the clock, have the hire teach it back while doing it:
- Power the monitor on in clean air and zero it. ✔ performed, not described
- Show you the calibration-due date and tell you what an overdue date means.
- Run the bump test and state what a failure means.
- Recite your site's four alarm numbers and the one rule.
- Clip the monitor on in the breathing zone, correctly, first try.
Five checks, each pass/fail, each observable. A miss on any one is a two-minute re-teach of that step, not a failed employee — the teach-back exists to find the gap while you are still standing there. Record who was trained, on which instrument (serial number), by whom, and the date: if an incident is ever investigated, "we showed him the meter" is not a record, and a one-line training log is.
What 15 Minutes Does Not Cover — Say So in the Training
Honesty about scope is part of competence. This drill does not qualify anyone for:
- Confined-space entry. Permit-required confined space work carries its own training duties under OSHA 29 CFR 1910.146(g) — hazard recognition, entry procedures, attendant and entrant duties, rescue arrangements — far beyond monitor operation.
- Calibration. Adjusting span, changing setpoints, and replacing sensors are trained, documented tasks for designated people, not every wearer. (When a fleet's calibration programme needs building or rebuilding, that is exactly what CPS calibration services do — on-site by written quote, or ship-in, covering every channel on the instrument.)
- Interpreting unusual readings. Negative readings, over-range events, cross-sensitivity surprises from other gases — a new hire's correct move is always the same: withdraw and ask. Interpretation is a supervisor skill.
Stating these limits takes thirty seconds and prevents the most dangerous outcome of short training: a hire who believes 15 minutes made them an expert.
The Mistakes That Waste the 15 Minutes
- Training on the wrong model. Buttons, menus, and alarm behaviour differ; the hire will fumble theirs under stress.
- Skipping the bump test "because there's no gas handy." You have just taught that verification is optional — the opposite of the lesson.
- Zeroing wherever the group happens to be standing. If it is beside a running vehicle, you have demonstrated the worst habit in gas detection and called it training.
- Teaching numbers without the rule. A hire can recite 19.5% perfectly and still stand in an alarming atmosphere deciding what to do. The rule — leave first, report second — is the point of the numbers.
- No teach-back. Attendance is not competence. If they did not do it in front of you, you do not know they can do it without you.
Frequently Asked Questions
How long does it take to train someone to use a gas detector?
Fifteen minutes is enough for the core operational drill — what the monitor measures, power-on and fresh-air zero in clean air, a hands-on bump test, the alarm numbers, the leave-on-alarm rule, and correct wearing position — provided the trainee performs each step and teaches it back. That qualifies them for supervised work with that specific monitor. Broader duties such as confined-space entry, calibration, and interpreting abnormal readings require additional, separate training.
What should a new hire be taught first about a gas detector?
What it measures and what normal looks like: on a standard 4-gas monitor, oxygen 20.9%, combustible gas 0% LEL, carbon monoxide 0 ppm, and hydrogen sulfide 0 ppm in fresh air — plus the fact that the instrument only samples the air at its sensors, so wearing position matters. Every later lesson (zeroing, bump testing, alarms) builds on knowing what a healthy reading is.
Do you have to bump test a gas detector every day?
OSHA's guidance on direct-reading portable gas monitors follows the ISEA position: a bump test or calibration check should be conducted before each day's use, in accordance with the manufacturer's instructions. If the instrument fails the bump test, it must be fully calibrated before use — and if it fails calibration, removed from service. In the 15-minute training, every new hire performs a real bump test so the daily habit is learned by doing, not by being told.
What is a fresh-air zero and why does it matter where you do it?
A fresh-air zero sets the instrument's baseline in known clean air — defined as 20.9% oxygen and zero on all other channels. Location matters because the monitor believes whatever air it is zeroed in: zero it in contaminated air and it treats that contamination as "zero," offsetting every subsequent reading so real hazards can display as safe. Always power on and zero in verified clean air, away from exhaust and process sources.
What are the standard alarm settings on a 4-gas monitor?
Typical factory defaults are: oxygen low alarm 19.5% and high alarm 23.5%; combustible gas (LEL) low alarm 10% LEL and high alarm 20% LEL; carbon monoxide low alarm 35 ppm; hydrogen sulfide low alarm 10 ppm. High alarms for the toxic channels and all setpoints are configurable and vary by model and site policy, so confirm the actual settings on your own instruments and train to those numbers.
What should you do when a gas detector alarms?
Leave. Move immediately to fresh air, do not finish the task in progress, do not hold your breath and hurry, and never silence the alarm and remain in the atmosphere. Once clear, report the alarm to your supervisor — an alarm is information the site needs, including where it happened and what the peak reading was if it can be safely retrieved later. This single rule is the most important content of new-hire training.
Where should you wear a gas detector?
In the breathing zone — clipped to the chest, collar, or shoulder strap near the nose and mouth, with the sensor inlet unobstructed. Not in a pocket, under clothing, or on a belt at the back. The monitor can only sample the air that reaches it, so wearing it away from the breathing zone means it measures different air from the air the wearer is actually breathing.
What is the difference between a bump test and a calibration?
A bump test is a quick functional check: challenge gas is applied to confirm every sensor responds and every alarm activates. It proves the instrument works but does not adjust its accuracy. A full calibration adjusts the instrument's readings to match certified gas concentrations at zero and span. A failed bump test triggers a full calibration before use; a failed calibration removes the instrument from service.
Can a new hire use a gas detector for confined space entry after 15 minutes of training?
No. Fifteen minutes of monitor training covers supervised personal use of one instrument. Permit-required confined space entry requires its own training under OSHA 29 CFR 1910.146(g) — covering hazard recognition, entry and attendant duties, atmospheric testing procedure, and rescue arrangements — in addition to monitor skills. Pre-entry atmospheric testing with a pumped instrument is also a separate procedure from wearing a diffusion monitor.
How do you know if gas detector training worked?
By teach-back, not attendance: the trainee powers on and zeros the monitor in clean air, shows the calibration-due date and explains it, runs a bump test and states what a failure means, recites the site's alarm numbers and the leave-on-alarm rule, and clips the monitor on in the breathing zone — all performed in front of the trainer, pass/fail. Record the trainee, trainer, instrument serial number, and date; a signature on a roster without demonstrated skills is not evidence of competence.
The Bottom Line
Fifteen minutes, spent as a drill instead of a lecture, produces a new hire who can do the five things that actually keep them alive: recognise a normal reading, zero in clean air, prove the instrument responds with a bump test, act on the alarm numbers without deliberating, and wear the monitor where their lungs are. Everything else — confined-space qualification, calibration, interpretation — is layered on afterwards, and the training itself should say so. A short lesson that is honest about its limits beats a long one nobody remembers.
Need monitors for a growing crew, gas for the bump-test station, or a calibration programme behind the training? Call 865-900-8844 or reach us through Contact Us. Browse portable multi-gas monitors, single-gas monitors, calibration gas, or our calibration services.
CPS Calibrations · 109 S. Front Street, Rockwood, TN 37854 · Calibration Gas · Calibration Services · Contact Us
Need a calibration you can file?
In-house calibration at CPS in Rockwood, Tennessee — $55 for single-gas instruments, $90 for 4- and 5-gas — every channel, as-found and as-left data, full certificate.
See Calibration Servicesor call 865-900-8844
Recent Posts
-

How Long Do Gas Detector Sensors Last?
Gas detector sensors do not share one lifespan: a traditional galvanic oxygen sensor typically lasts …Nov 16th 2026 -

The 15-Minute Weekly Gas Detection Checklist for Supervisors
A weekly gas detection check takes a supervisor about 15 minutes and covers four things: every instr …Nov 15th 2026 -

Calibration Gas for PID Instruments: Isobutylene and the 100 ppm Standard
A PID is calibrated on 100 ppm isobutylene — not on the gas you are measuring — because the instrume …Nov 14th 2026